You will hear of many defenses against an opponent’s notrump.
This is because one tries to open the most descriptive bid of one notrump as much as possible. This includes any balanced distribution with the shortest suit an unstopped doubleton.
A hand with two stopped doubletons and not five four in the majors can also be opened one notrump with 15 to 17 points.
Names such as DONT, Cappelletti, Landy, Hello and many others will add to the confusion of what to do against one notrump bid by the RHO.
Some play a defense against notrump in the direct seat or pass-out seat. I play a system in the direct seat only. The danger of being doubled is considerably less when right hand opponent has passed.
The simplest system is natural overcalls and double showing 15 to 18 high card points. The next simplest is transfers.
This places the notrump bidder on the opening lead. Sometimes, it is very beneficial making the notrump opener lead from his strength.
If LHO opens one notrump, two clubs transfers to two diamonds, two diamonds transfers to two hearts, two hearts transfers to two spades and two spades transfers to three clubs.
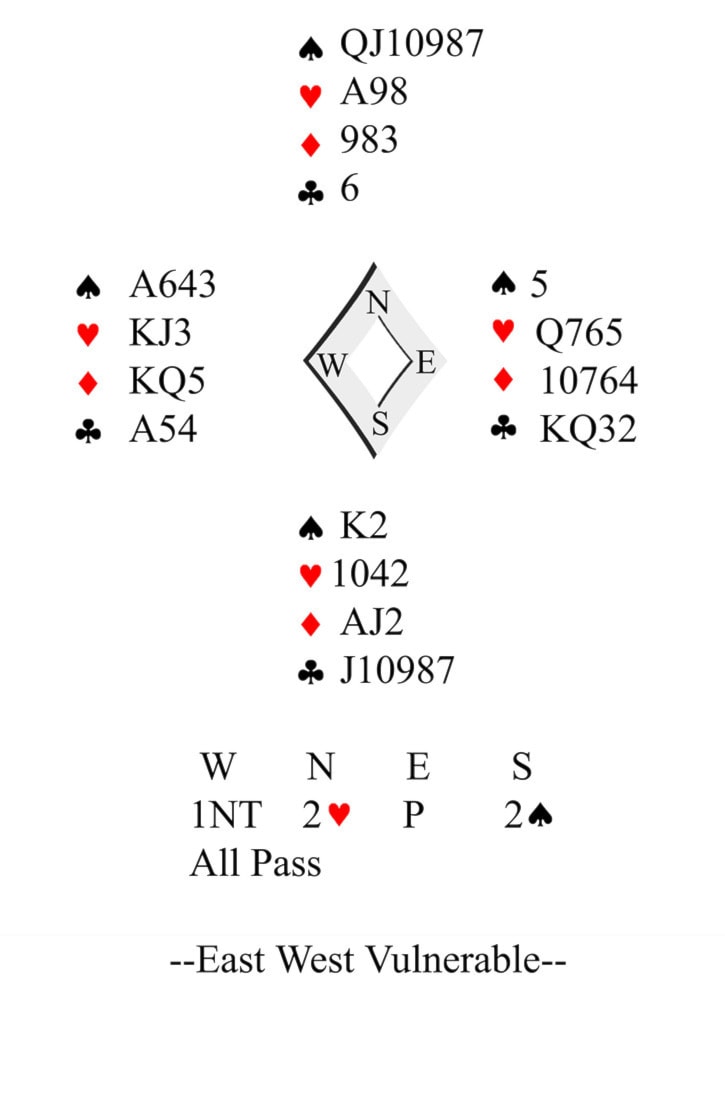
The bidding:
West, in first seat, with 17 high card points opens one notrump. North has something useful to say because he has a long suit and wants to make his shortness in clubs useful.
He bids two hearts transferring South to two spades. East and West have nothing to say and South plays two spades.
The contract: Two spades by South
The opening lead: King of diamonds
East has an easy opening lead of the king of clubs. West’s lead is a difficult lead. He wants to find his partner’s strength.
If his partner is on lead, things are simple because his partner knows to lead from his strength. The weaker the player is, the more important it is for him to lead from any suit containing his only strength. Transfers made sure West is on lead.
The play:
Declarer ducks and West continues into South’s ace and jack. This is known as the Bath coup. Bath England was a stronghold of whist which is just bridge without the bidding.
West should see East’s low card on his king and switch to a club. West continues a diamond mostly because he does not want to break open another suit for the declarer.
South wants to set up his clubs for discards but the defense won’t let him. East gets in with a club and leads a heart. Declarer will lose a spade, two hearts, one diamond and one club.
The result: Two spades making for +110
Note:Do you have a question or a hand of note that occurred at your bridge table? If yes, send it to me at wt.watson@yahoo.ca and I will answer it. The questions may appear in a future column.